A healthy battery is the cornerstone to worry free Ferrari ownership and I always recommend that owners keep their car on a battery tender/conditioner such as an Accumate. However, it isn’t always practical keep a car in a location where it can be plugged into the mains so checking the battery drain can save unduly depleting its power.
There are three big advantages to keeping the battery healthy…
- The engine requires a lot of power to crank it over. A depleted battery can rob the electronic systems of crucial power on start up and result in spurious warning lights on the dashboard.
- The car actually requires a lot of power to run. If the alternator is asked to power the car and recharge a depleted battery it will damage the alternator over time. Early 360s can also suffer from wiring loom failure due to the increased currents involved.
- If the battery is depleted beyond what is needed to crank the engine then there is a temptation to jump start the car. Jump starting a modern Ferrari carries a real and significant risk of damaging expensive ECU and dashboard lighting panels. The danger point is when the external power source is disconnected causing the alternator to suddenly deliver up to 120V – not a nice place to be if you are an IC. (More info here).
Checking the battery drain is fairly straightforward and the procedure outlined here applies to all makes of cars, not just Ferrari. The official Ferrari maintenance program calls for the battery absorption to be checked at every annual service but many garages do not bother. Although it is straightforward to carry out with basic tools, working with the battery requires a high degree of diligence as mistakes with the electrics of these cars can have expensive consequences and can even endanger life. Please only proceed if you know what you are doing.
This post assumes that the alternator is in good order and capable of charging the battery. If the alternator isn’t charging the battery up properly then check the 7.5A fuse taped to the +ve battery cable.
To check the battery drain, the first step is to turn the battery isolation switch in the luggage compartment to the OFF position. Subsequently, gain access to the battery by removing the passenger footrest and the retaining crossbar (more info here). You can do the checks described here with the battery still in the cabin but I prefer to remove it completely from the car to have more space to work. Disconnected the two terminals (negative first) and take the battery out.
The battery needs to be reconnected to the car via a shunt and an ammeter. The basic circuit is as follows:
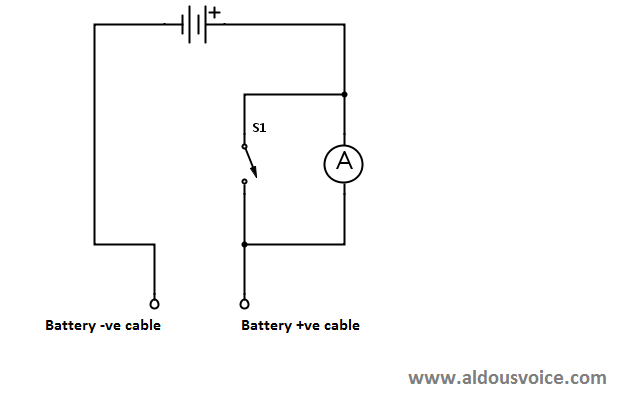
The negative cable is connected directly to the battery, using (for example) a clip-on connector as the one shown in the photo below. The positive cable is connected to the battery through a amp meter connected in series. In parallel to the amp meter is a shunt, operated by a switch. Even though the measurements described here will involve low steady-state currents (< 1A), transients due to systems powering up, locks operating, etc. can easily reach 20A so it is important to choose adequately-rated components, including cables (16AWG minimum), terminal blocks and switches.

At the other end, ring terminals are used to securely connect the wires to the vehicle loom.

It is very important to proceed very carefully when setting up these connections. A safe sequence of operations is as follows:
- ensure shunt switch is in the OFF (open) position
- ensure amp meter leads are disconnected from the amp meter itself
- connect the positive and negative clip-on connectors to the respective battery terminals (the order does not matter in this case as the battery is outside the car)
- switch the shunt ON: the alarm siren should chirp briefly
- select the highest range for DC Amps on your multimeter
- connect the “negative” lead to the the multimeter
- connect the “positive” lead to the multimeter. Note that most multimeters have a dedicated connector for current (as opposed to voltage, resistance, etc) measurements, and often a dedicated one for the highest-current range – this is the one you should use. At this point, even with the shunt ON, you will probably have a non-zero current reading if the internal resistance of the amp meter is comparable to that of the shunt.
- switch the shunt OFF

This is the first current measurement and it represents the absorption of all the components that are connected directly to the battery. i.e. those that bypass the (somewhat inappropriately named) battery isolation switch. There is no reference value for this absorption in the Workshop Manual, where it is only used in a lookup table to assess how often the battery should be recharged. The lowest value in this table is 40mA, so anything lower than that should be fine.

The second measurement to carry out is not prescribed by the Maintenance Plan but is, in my opinion, far more useful: the current draw with the car off and locked, but with the battery switch “ON”, which I think is how most of us leave our cars when not in use.
Again, there is a need to proceed carefully:
- switch the shunt ON
- disconnect the “positive” lead from the multimeter
- select the highest DC Amp range available and reconnect the “positive” lead
- make sure
- both car doors are closed (especially the driver’s door if you have an F1 car as this will periodically activate the F1 pump, which can draw up to 30A)
- the interior cabin light is off
- the radio is off
- any other electrical device (eg phone chargers connected to the cigar lighter) are off or disconnected
- the heater blower is off
- switch the battery isolation switch to the ON position
- close the luggage compartment lid firmly
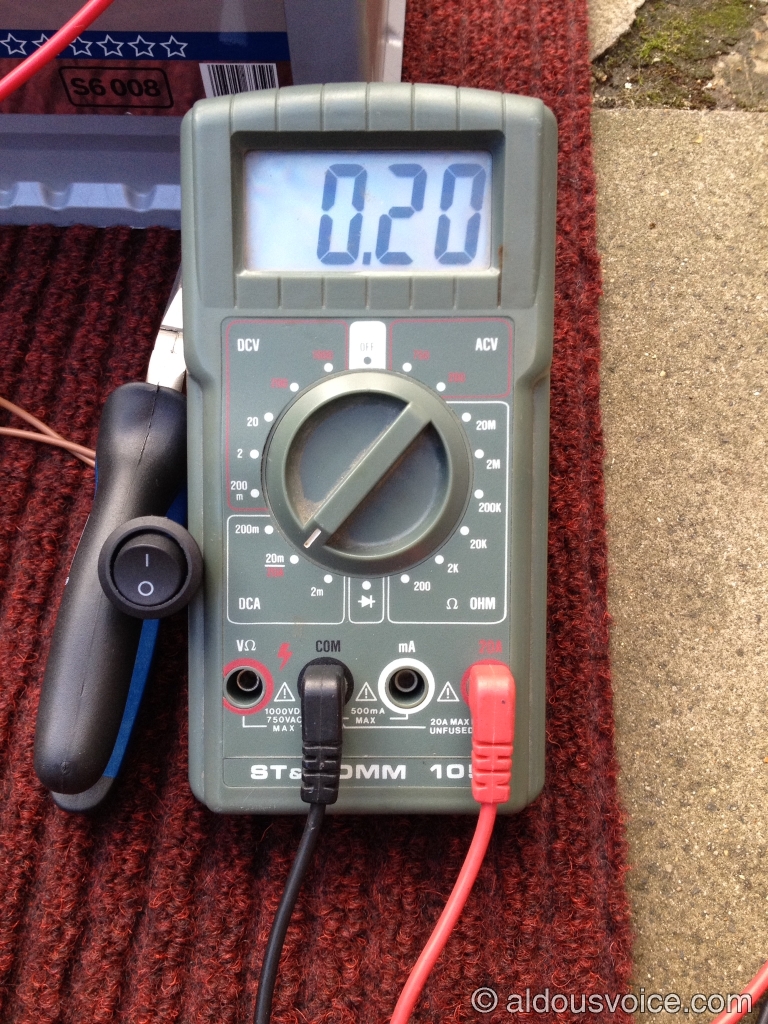
Systems will now power up and there will be a few transients. Lock the car and arm the alarm using the alarm fob as you normally would. Next, switch the shunt OFF and you will obtain a first reading. If less than ~3 minutes have passed since you locked the car, you will get a relatively high reading: in this case, 0.2A.
After about three minutes, this should decrease to the true long-term current draw. In this case, 0.05A. Note that the 3 minute time interval to get to the low steady state gets reset if either door is opened or a door is attempted to be opened.

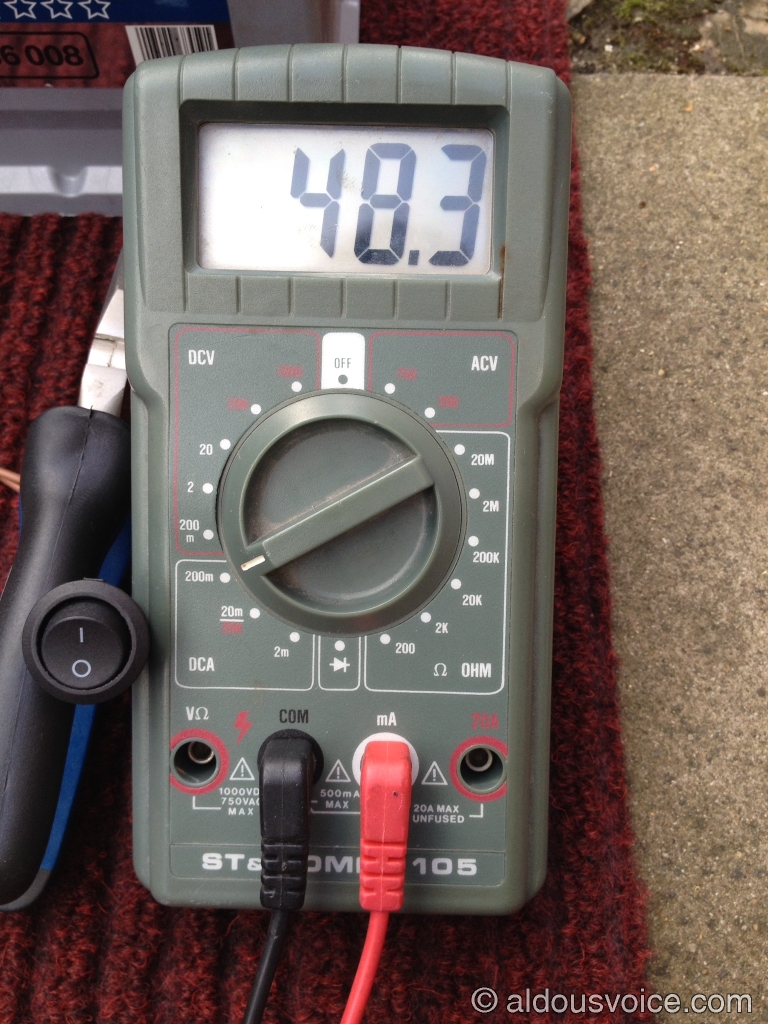
If you want a more accurate reading, follow the procedure above to switch the multimeter to a lower range. In this case it gave a value which oscillated slightly between ~48mA and ~51mA.
A 50mA draw in a “parked” state equates to an 8.3Ah drain over a week, which should be withstood easily by a healthy battery even if not connected to a tender. It should also be noted that the car in this article has the radio-controlled luggage compartment opener installed (link) which contributes ~8mA to the “parked” current draw (but not to the “battery OFF” current draw).
If your current draw is substantially higher than 50mA and you have checked that you have not accidentally left any electrical devices switched on, you will have to track down the source by removing fuses in turn and observing the resulting draw, or by measuring the current through each fuse using specially-designed multimeter leads. It can be a long and tedious process but common causes of battery drain are:
- Faulty tracker unit (this will cause a high draw with the battery isolations switch in the OFF position
- Faulty outer door handle cable or micro switch on the outer handle. Wiggle the handles slightly and check for changes in current draw.
- Faulty radio head unit (even when the radio is switched off). Pull fuse 69 and check for a drop in current draw.
Related posts:
- Ferrari F430 Battery Change
- Ferrari 360 Battery Change
- Jump starting a flat battery
- Fitting a battery tender
If you enjoyed this post why not subscribe to this blog for further updates? Simply enter your email address in the box at the bottom of this page. Your email address will not be shared.

Aldous
I can’t stress too highly that people remove the NEGATIVE battery terminal first as you quite rightly described. Why, well if you don’t and you accidentally touch any metallic part of the vehicle when removing the positive terminal you will get a dead short and the consequences of that can be very damaging least of which is a fire! I remember well tightening the head bolts on my Triumph Herald and accidentally touching the positive terminal of the battery with the wrench (spanner) handle. Boy did that get hot in a hurry and I had burns on the palm of my hand so beware.
Alan