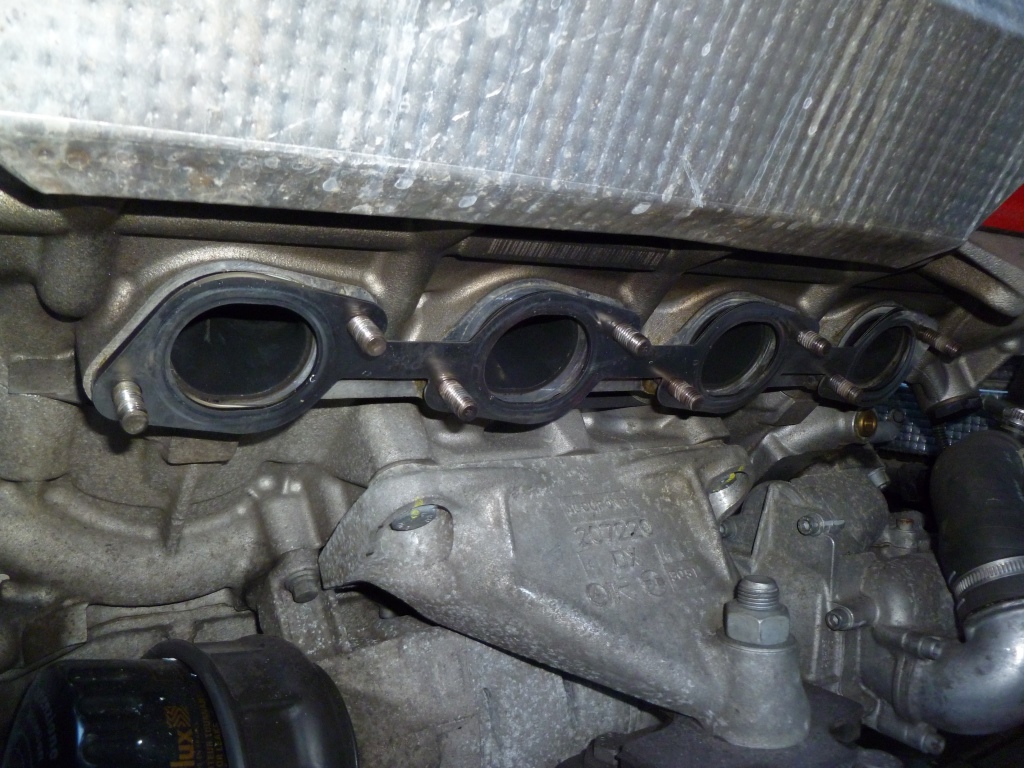
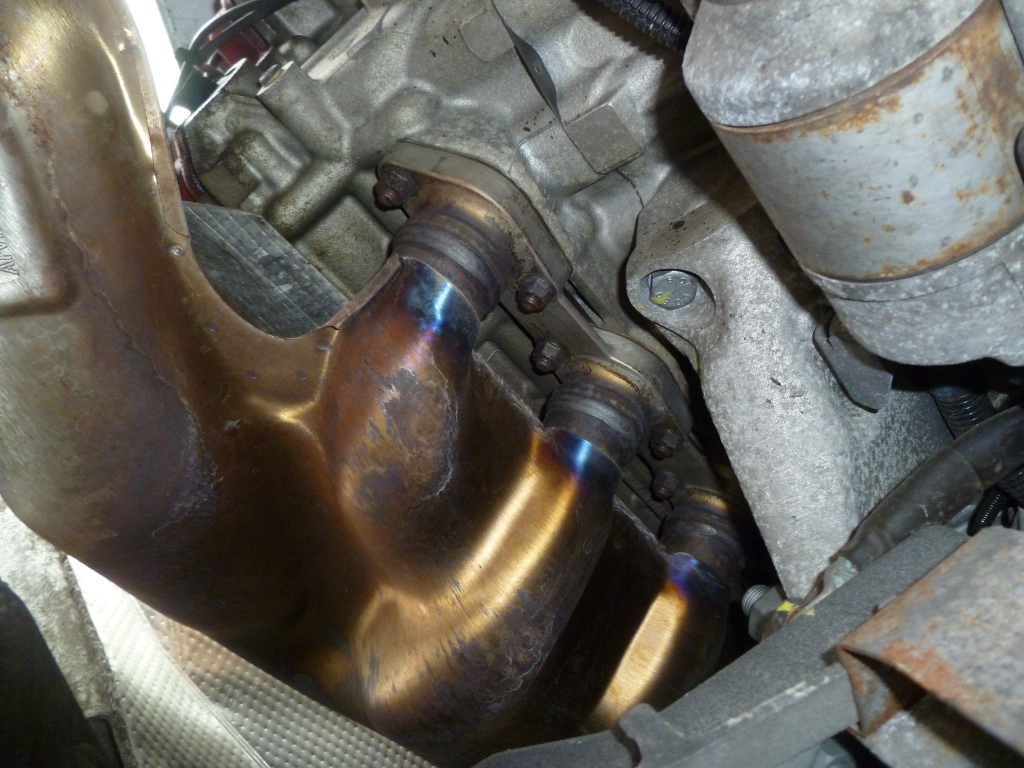
The Ferrari F430 has a major flaw with the exhaust manifold design. The manifolds (or headers) are susceptible to failure by cracking at the welds. Since they are covered with insulation and a heat shield, it is not that easy to detect – if a failure is not detected and rectified early enough then severe engine damage can occur.
All F430 cars (excluding the Scuderia) have a catalytic converter installed in the manifolds to help keep the emissions down on cold starts. This is slightly different from the 360 as only Federal spec cars had these “Pre-Cats”. A broken manifold can lead to the catalyst honeycomb breaking down which allows ceramic and metallic particles into the exhaust system. During valve overlap, when both the exhaust and intake valves are open at the same time, it is possible for these particles to get sucked back into the cylinder. Occurrences of this type have been well documented in the Ferrari community and, in my opinion, are a big risk in F430 ownership.
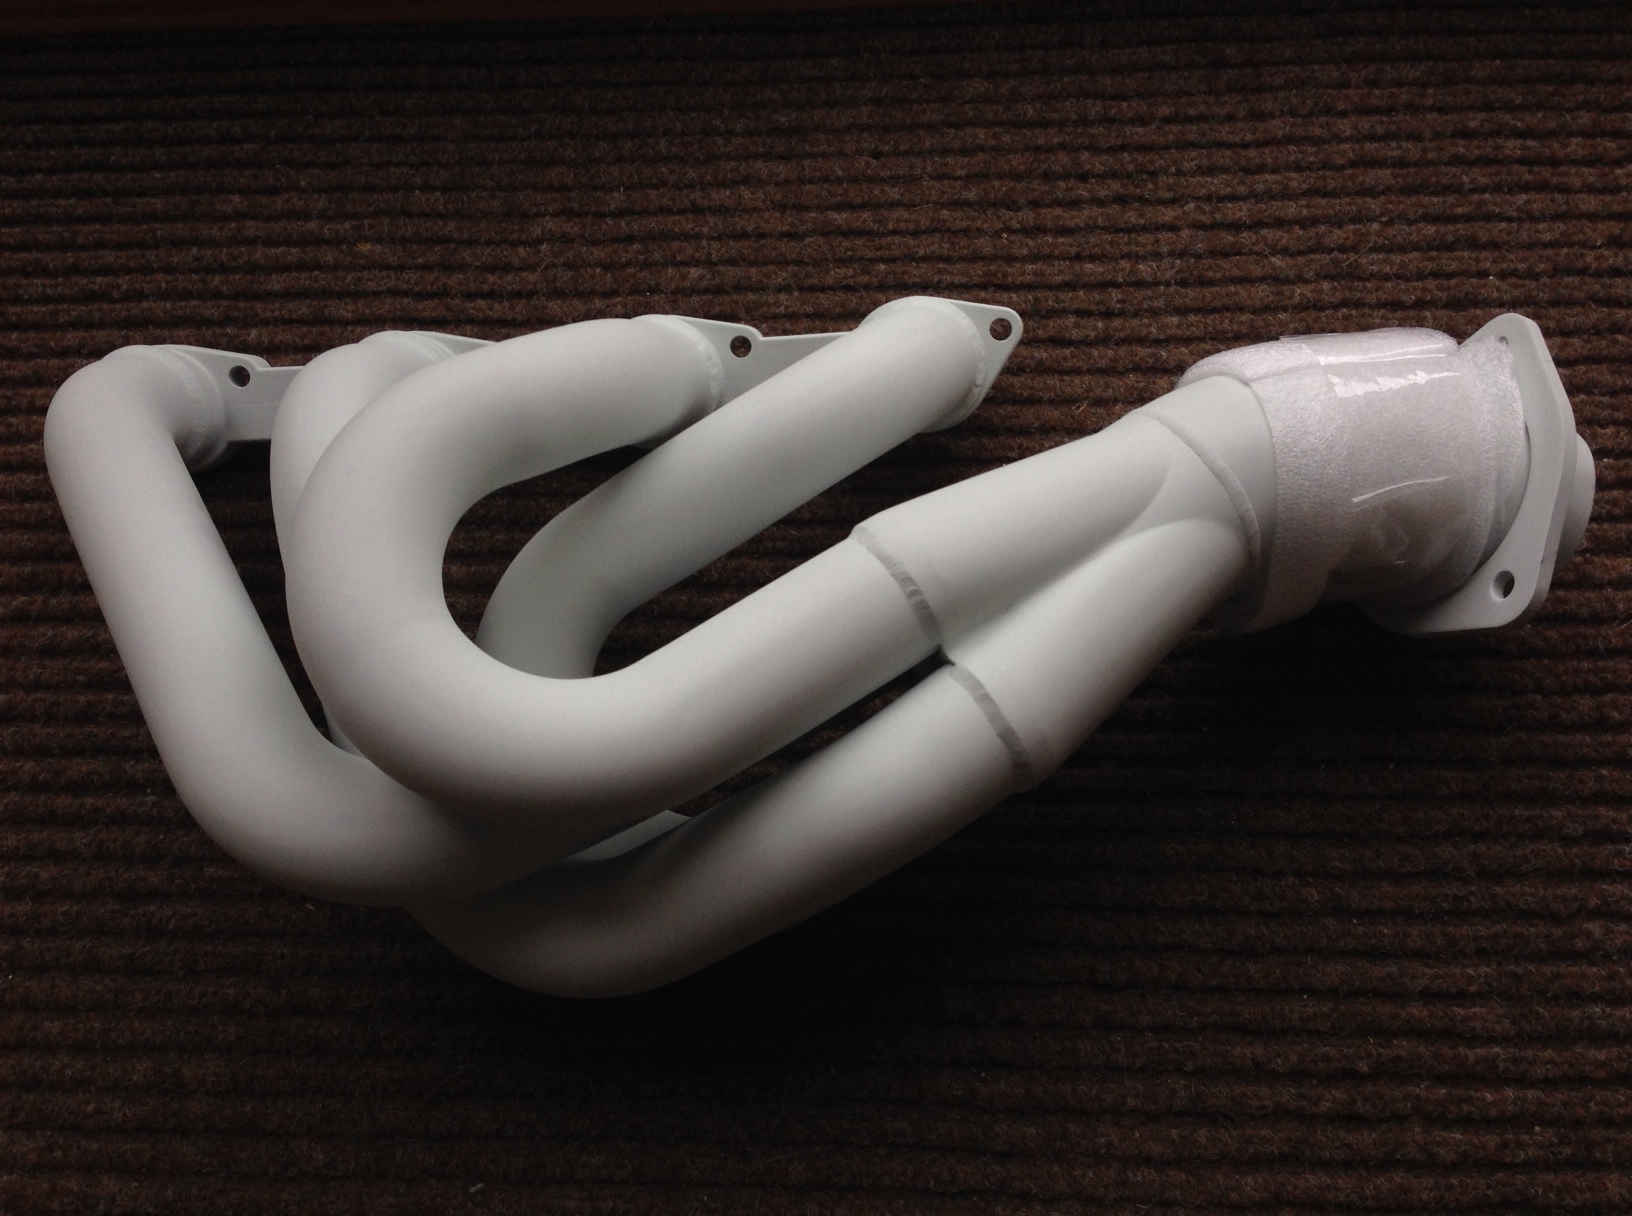
In order to mitigate against this happening the manifolds can be changed for stronger aftermarket units which do not contain a catalytic converter. There are several choices out there but, in my opinion, there are only three real contenders:
- Capristo
- Fabspeed
- Agency Power
Capristo has the best offering for this application with a beautifully crafted product and some innovative heat blankets. However, they also have a price to match. Fabspeed and Agency Power manifolds are the same, made in the same factory in Taiwan. These manifolds are considerably better value and I thought the money saved could be better spent elsewhere on my car.
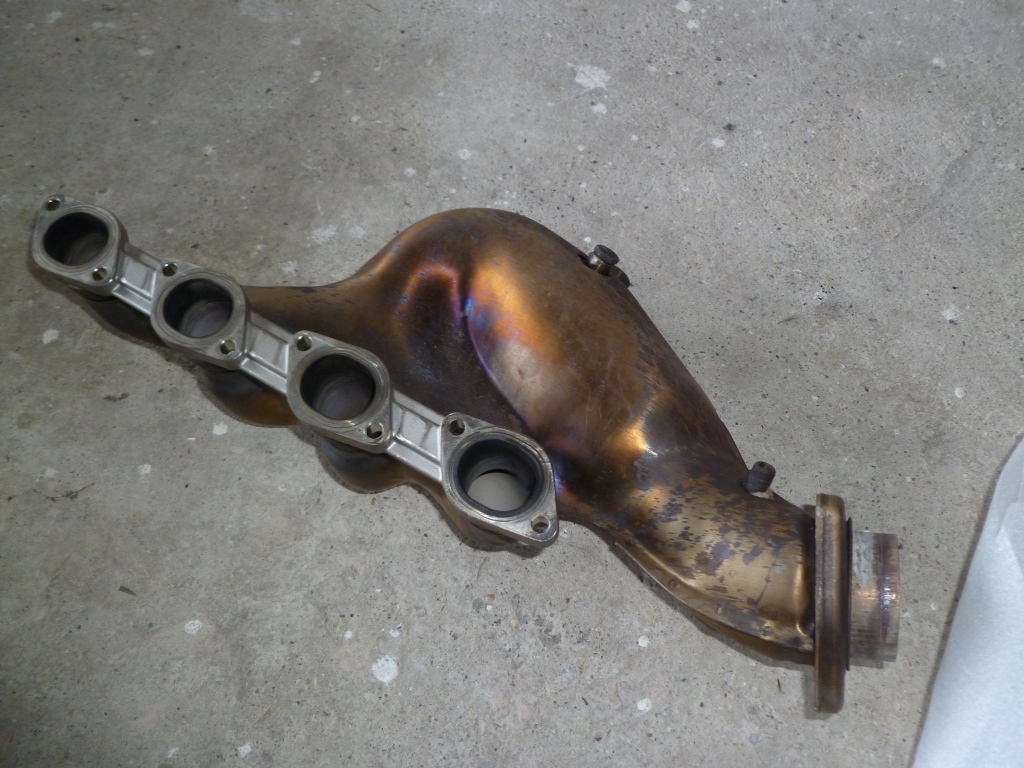
I bought a pair of AgencyPower manifolds from Vivid Racing. The proprietor, Rob Rohn, really looked after me and I have no hesitation in recommending him. I chose to have them ceramic coated by Vivid prior to shipping so it took about ten days from paying to getting them over here in the UK.
Fitting wasn’t difficult, just fiddly. If you have access to a ramp then this job can be done in a day. Although there are a few ramps I can call on I wanted to perform a number of tasks whilst the undertray was off so elected to do this at home. If, like me, you are working with axle stands then allow a day and a half unless you work really quickly.
Firstly take off the engine bay panels – see the beginning of this post for details on how. Also disconnect the battery so the ECU adaptive parameters are cleared.
Next the undertray needs to be removed. I did this by jacking up one side at a time and undoing the bolts by reaching under – more details in this post.
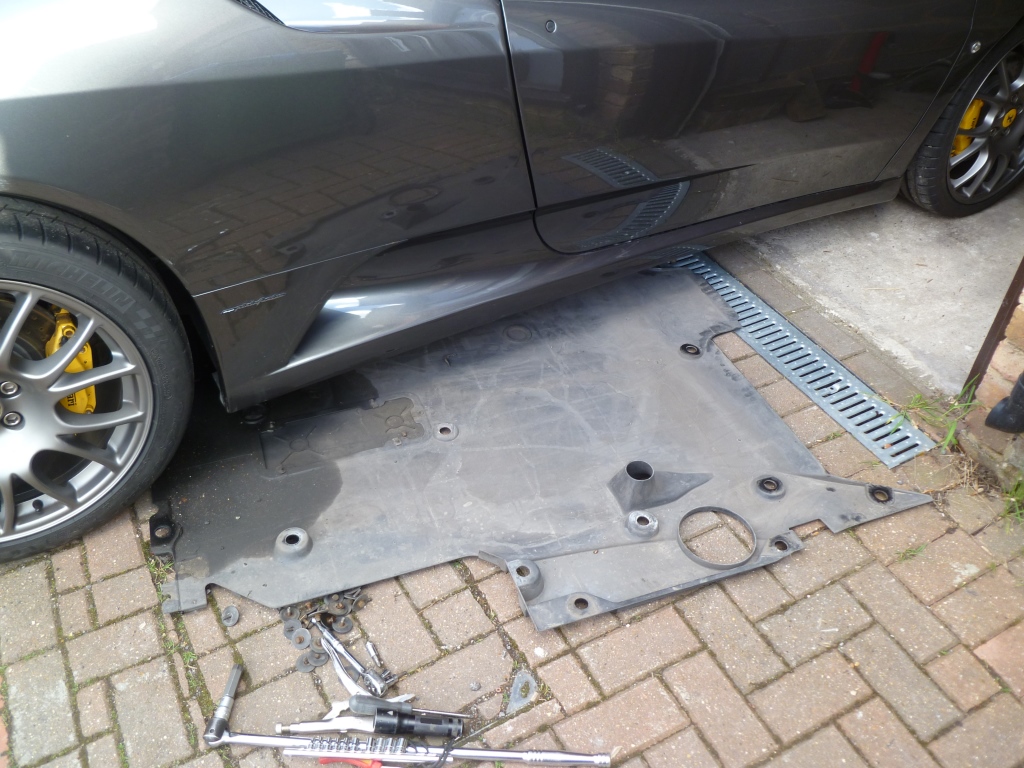
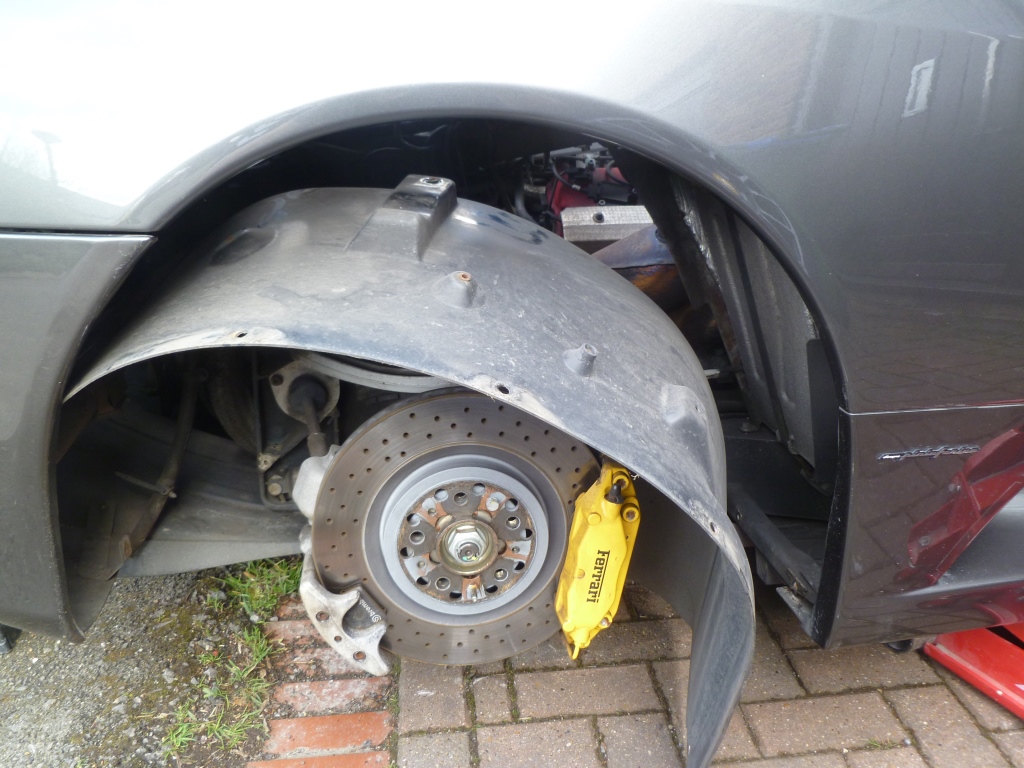
I removed the rear wheel arch liners so I could photograph the manifolds more easily and also I wanted to clean them up. They are held in place with a number of screws and a single bolt at the top accessed from inside the engine bay. However, it is not necessary to take these off.
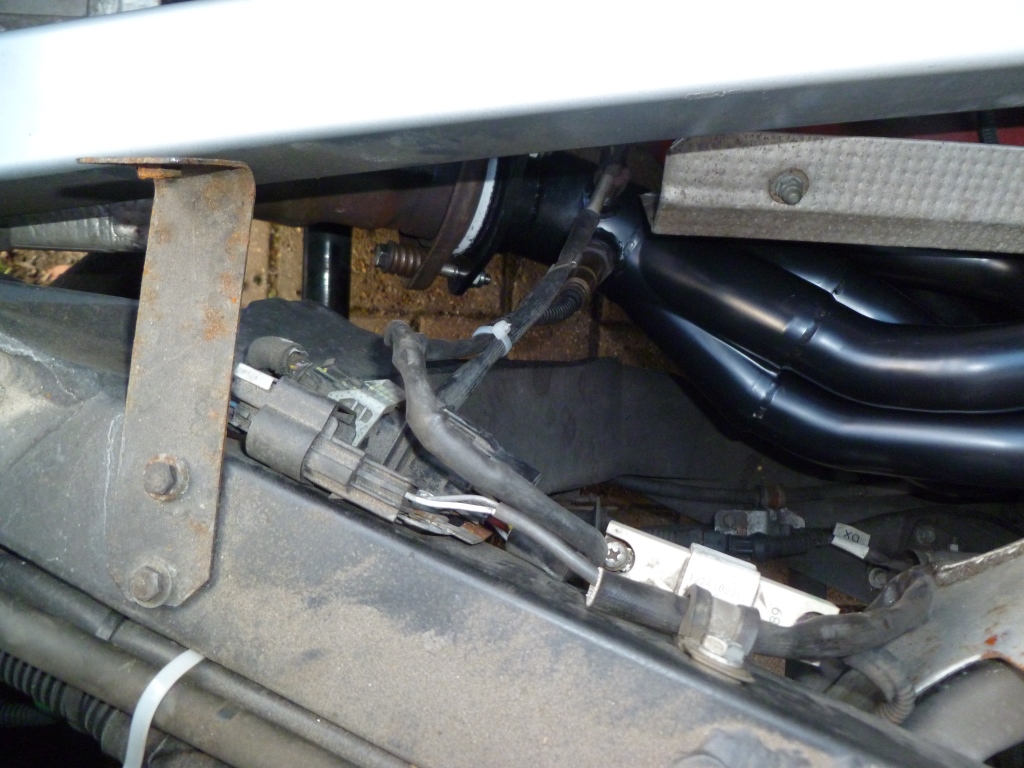
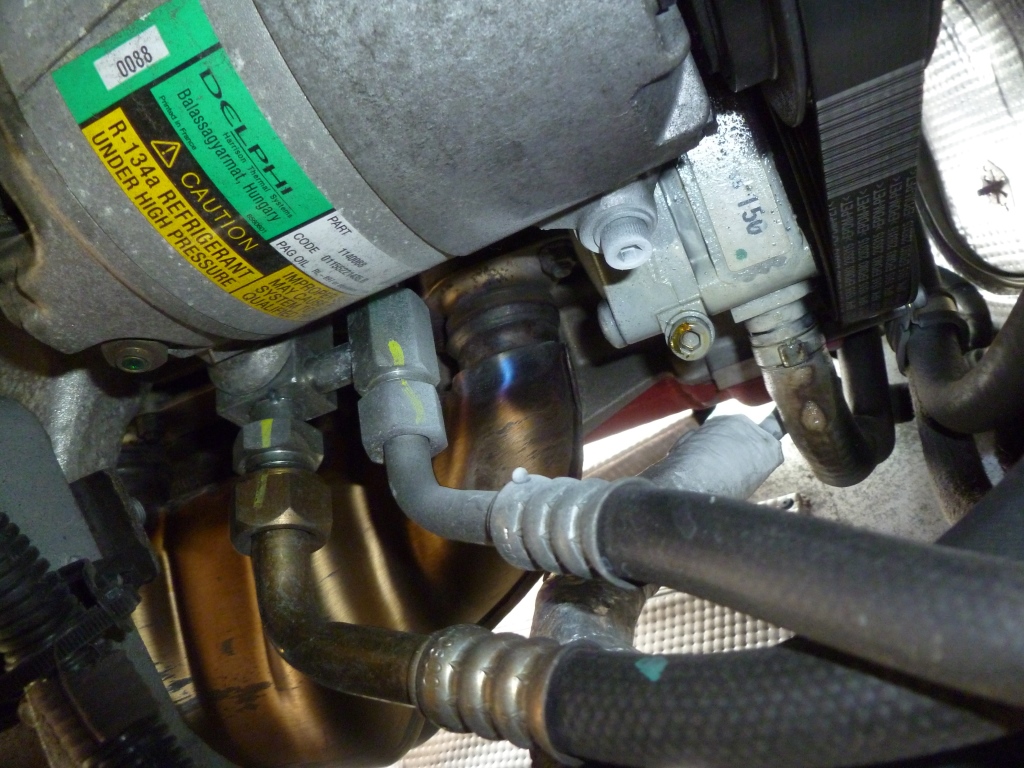
Working from in the engine bay, disconnect the oxygen (Lambda) sensors from the wiring loom. You will need to remove the “P” clips holding the wiring in place to the chassis.
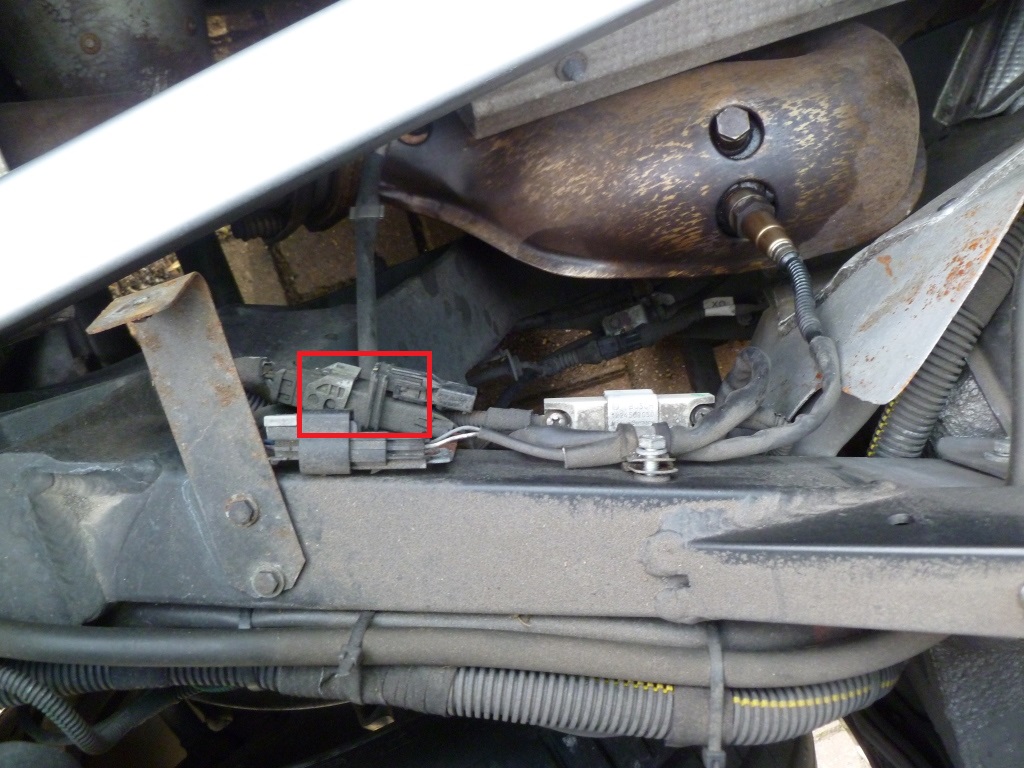
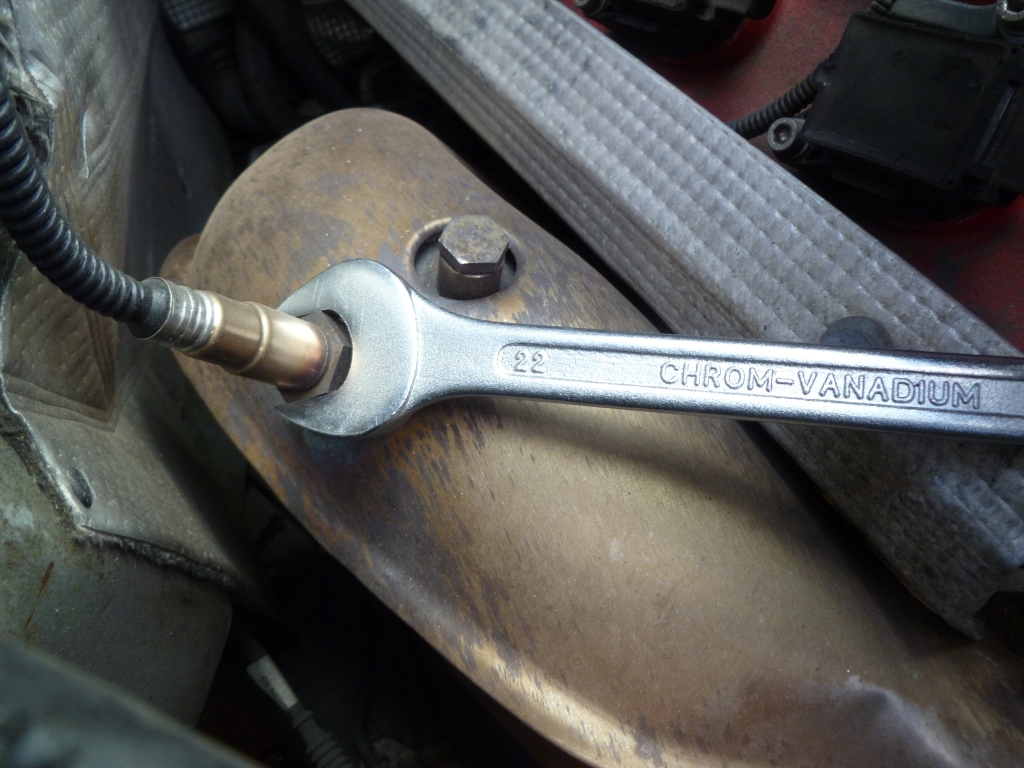
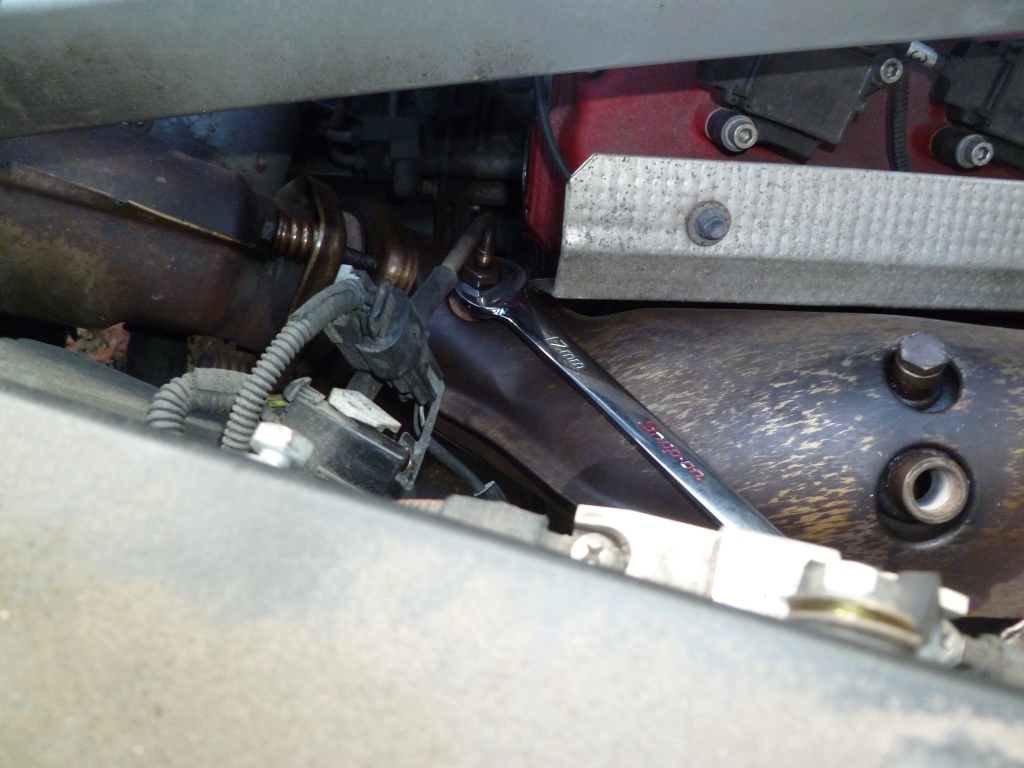
Next undo the Lambda sensors from the manifolds (22mm spanner). Put the sensors in a safe place taking care not to damage them.
Undo the temperature probes (17mm spanner) and move them out of the way taking care not to damage the tips.
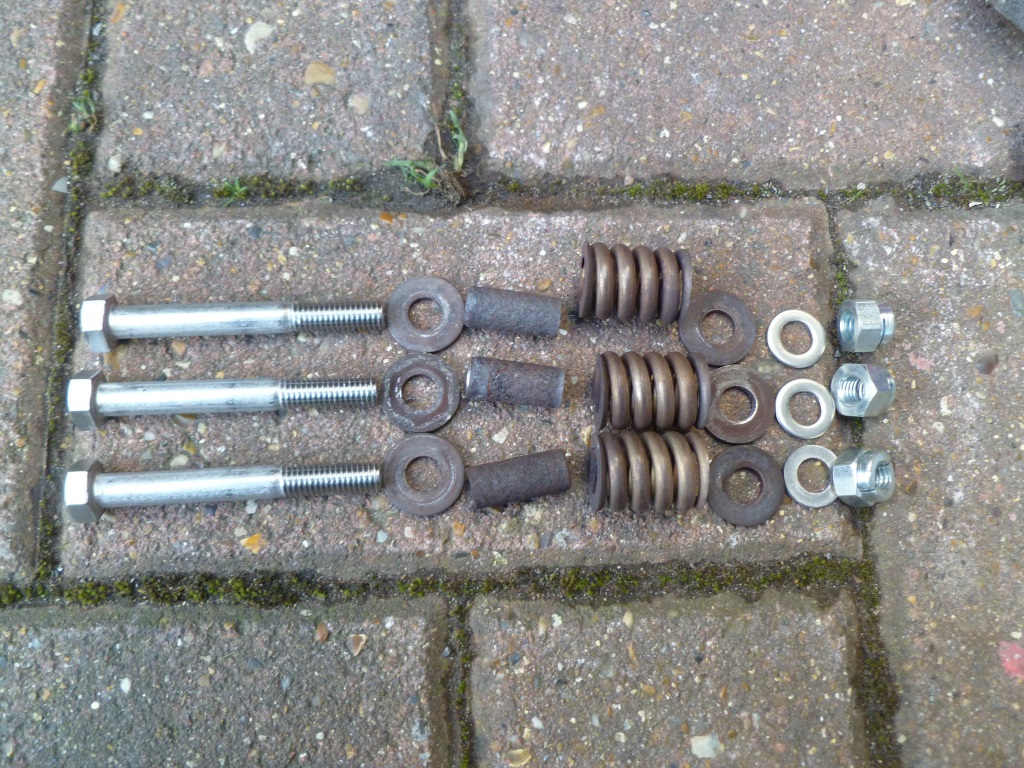
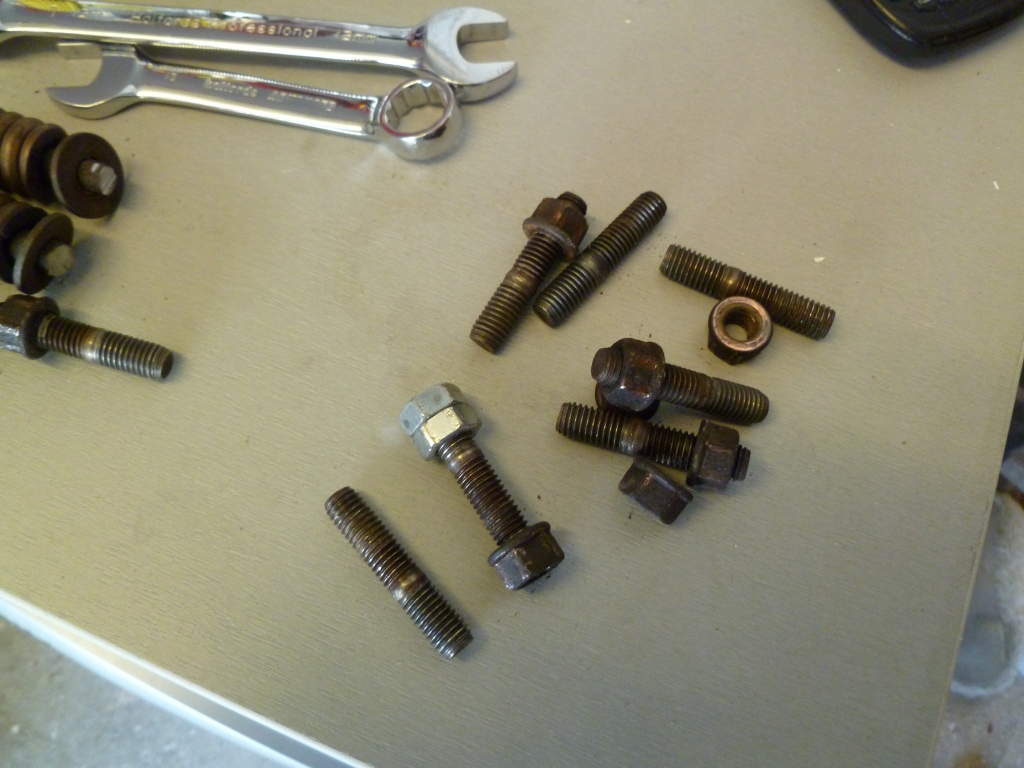
Undo as many of the bolts that join the manifolds to the cats as you can from the top. I only managed one per side, having to remove the others from underneath. Mine were badly rusted so I replaced with new stainless steel bolts (M8 x 65mm) and all metal self locking nuts (M8). I retained the springs, shafts and large washers.
Now the work has to be done from underneath. I raised one side at a time and worked by sliding underneath the car. I jacked up the side using the rear jacking point and rested the front jacking point on an axle stand. I also rested the front wheel on a couple of blocks of wood.
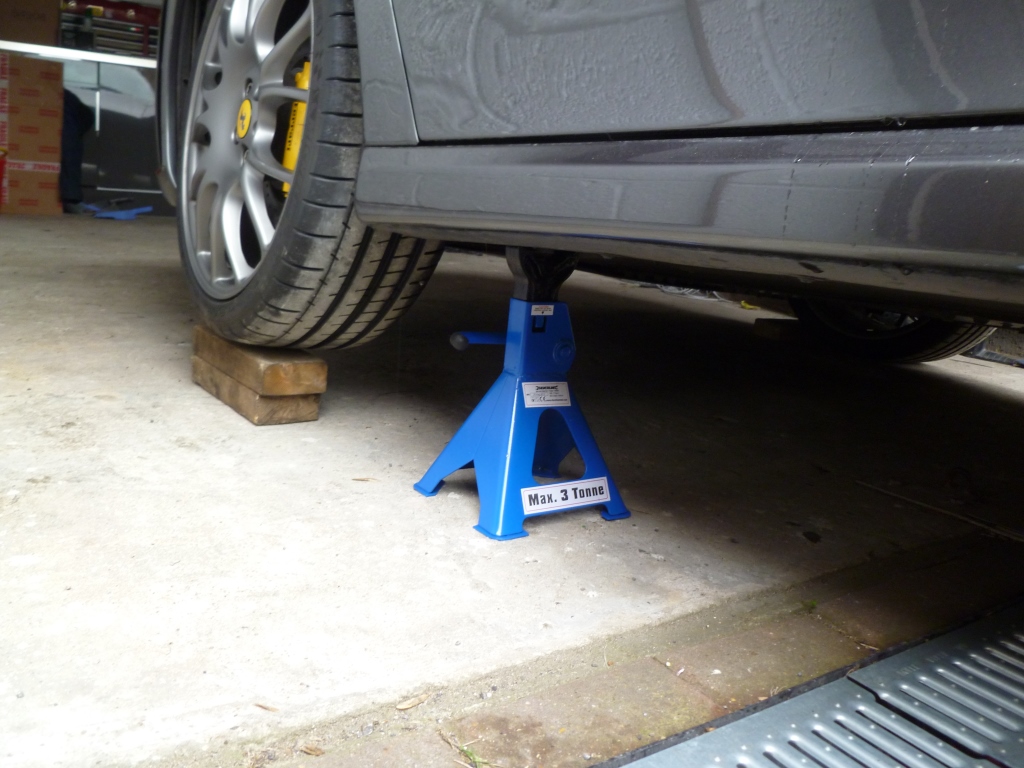
I rested the rear of the car on two axle stands under the chassis and used some wooden blocks under the wheel.
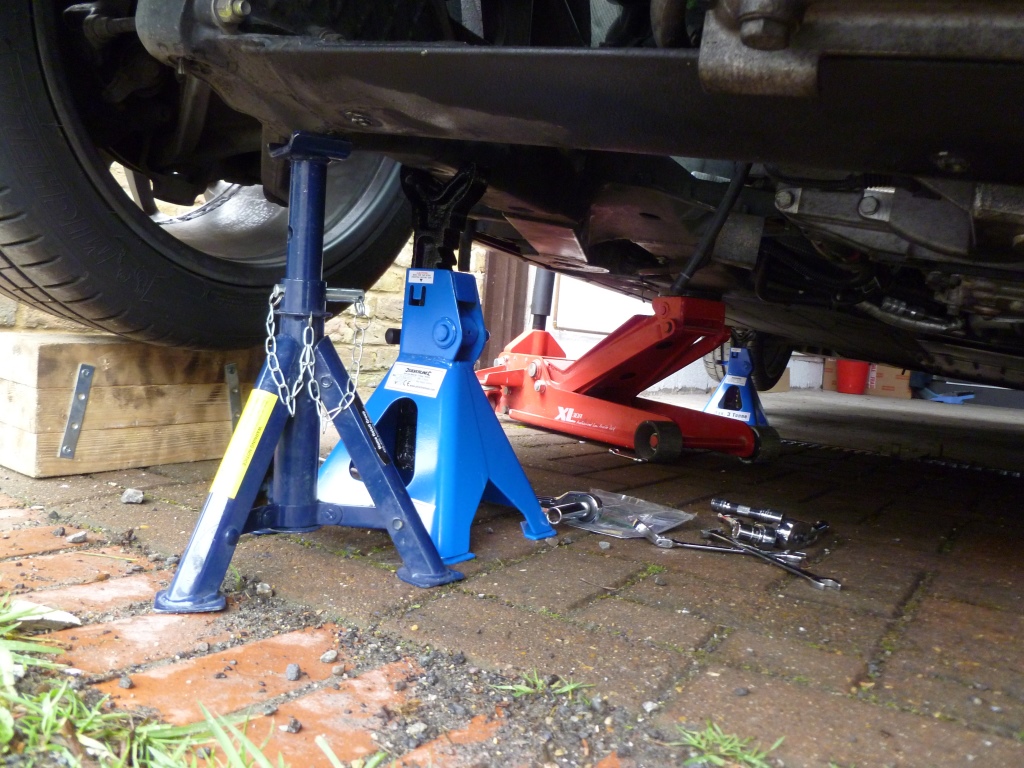
The jack was right where I wanted to slide in under the car so I moved it to under the chassis cross member just forward of the front of the engine.
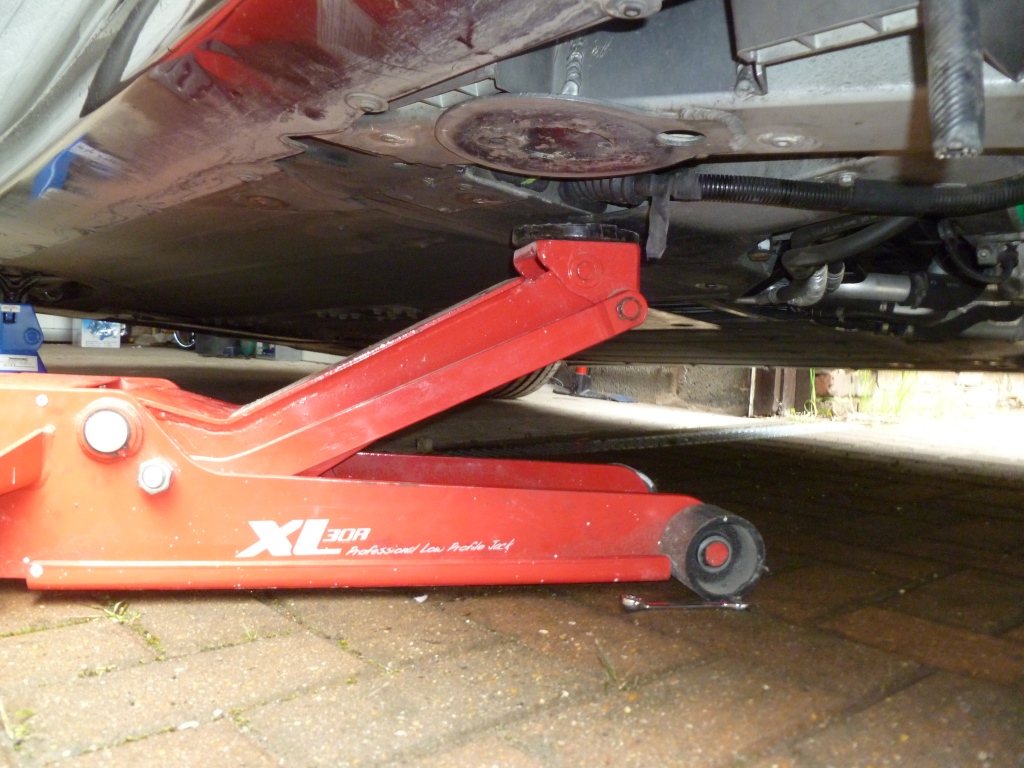
The way you have to slide under the car means that if it were to come down on you then a painful death is almost certain. Most of the weight was taken by the axle stands but I had the jack as a backup and the wooden blocks as a last resort. Please make sure you have adequate support before going underneath.
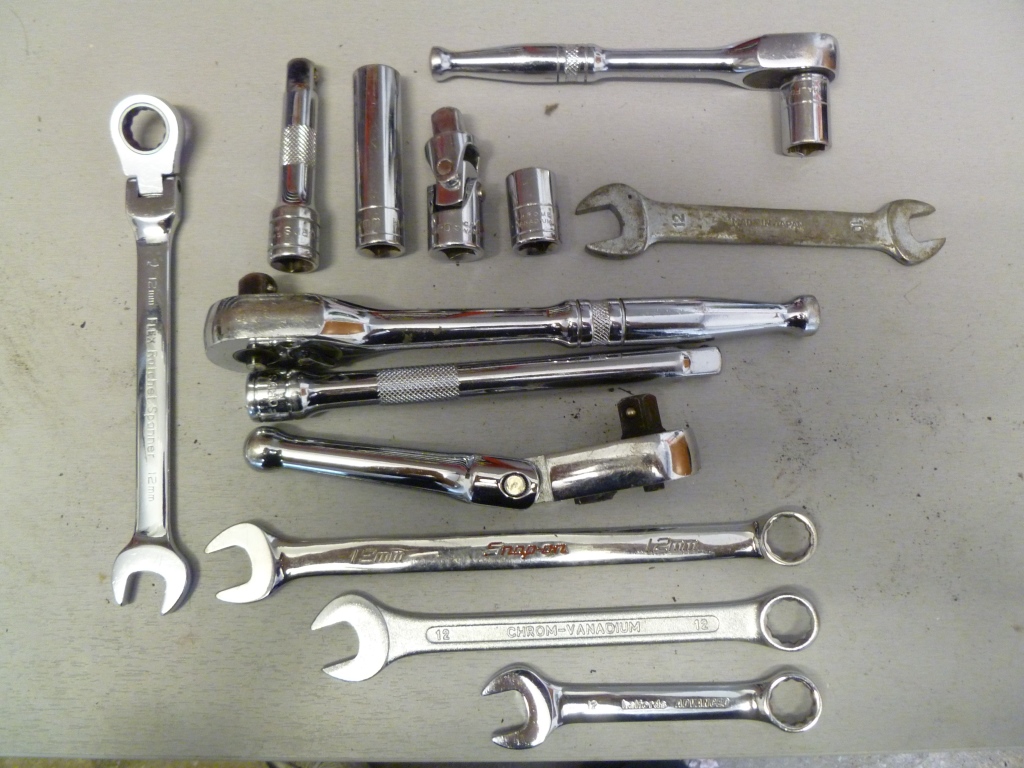
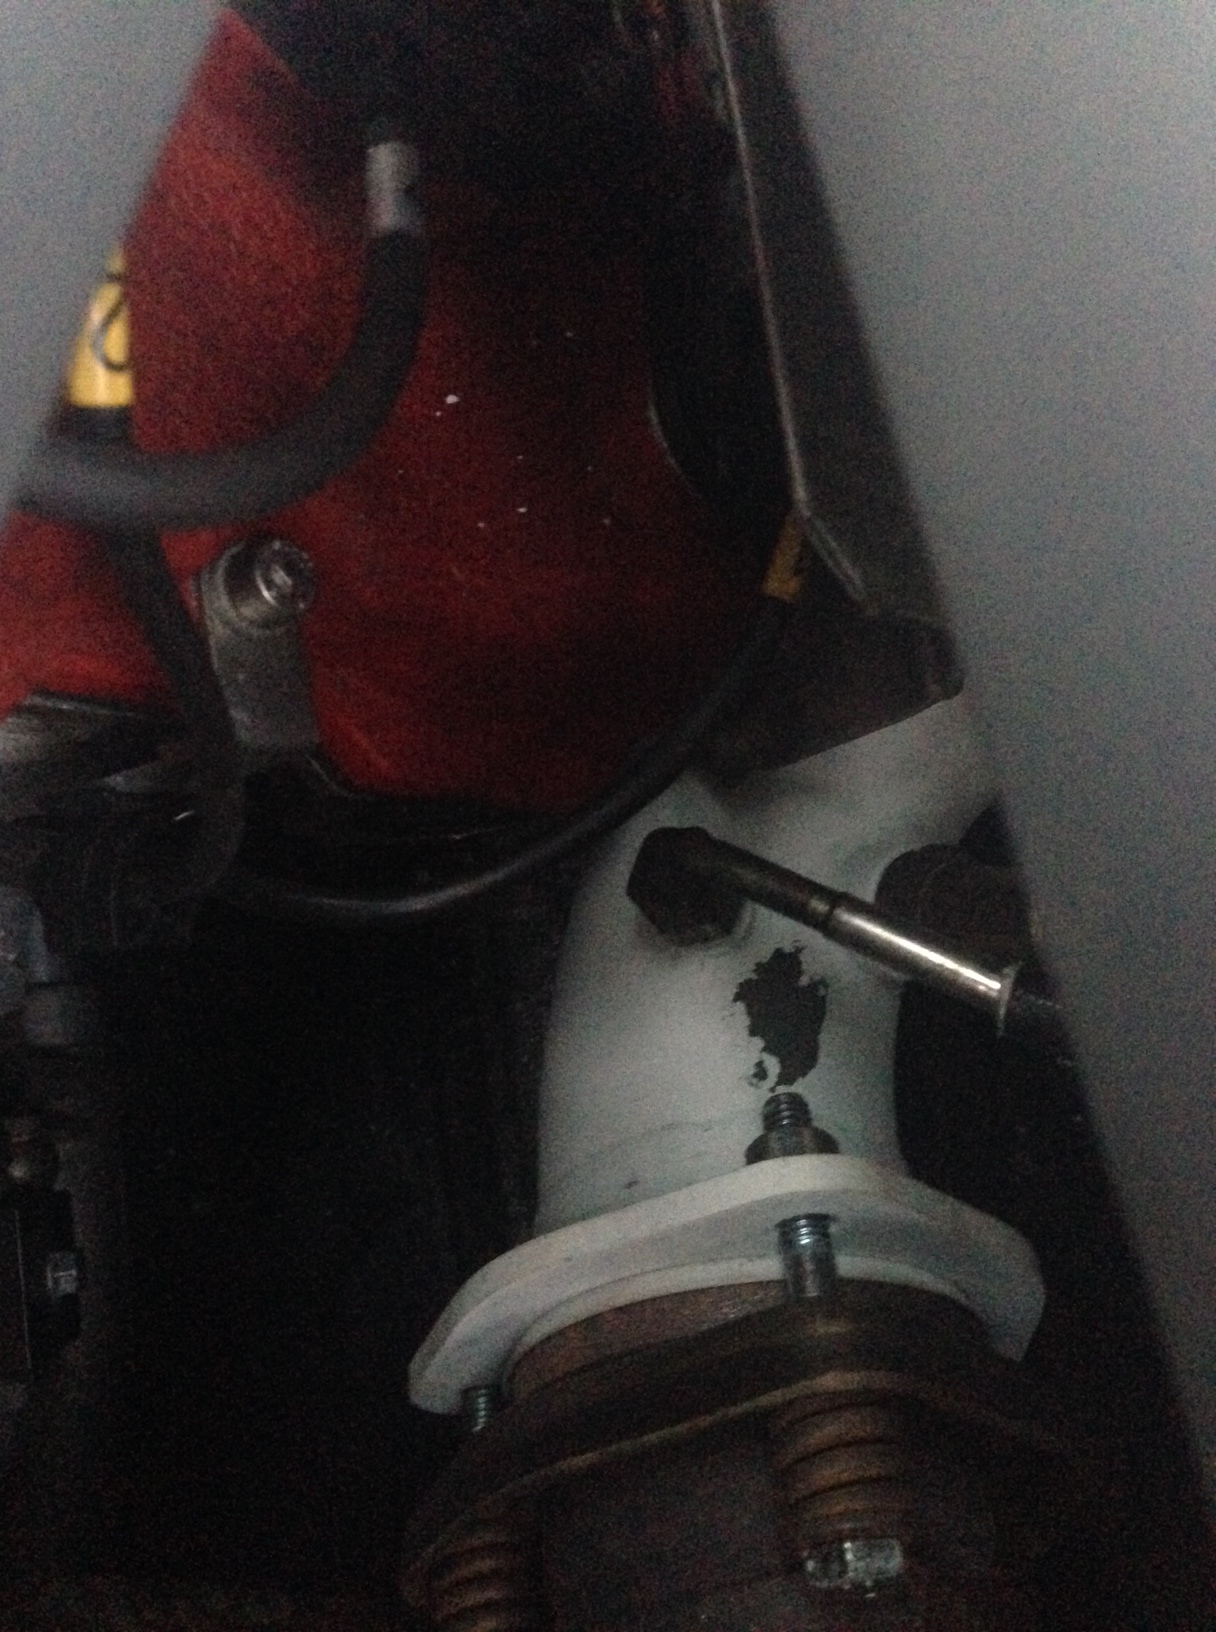
I started on the right hand side (this was the easiest as the AC compressor is in the way on the other side). Firstly undo the remaining cat-manifold bolts discussed above. Now that leaves just eight 12mm nuts to undo (per side). You will need an assortment of tools – I used every single one in the picture below. You wouldn’t be able to do this job without a really short spanner and a flexible head ratchet spanner as well as regular sockets and spanners.
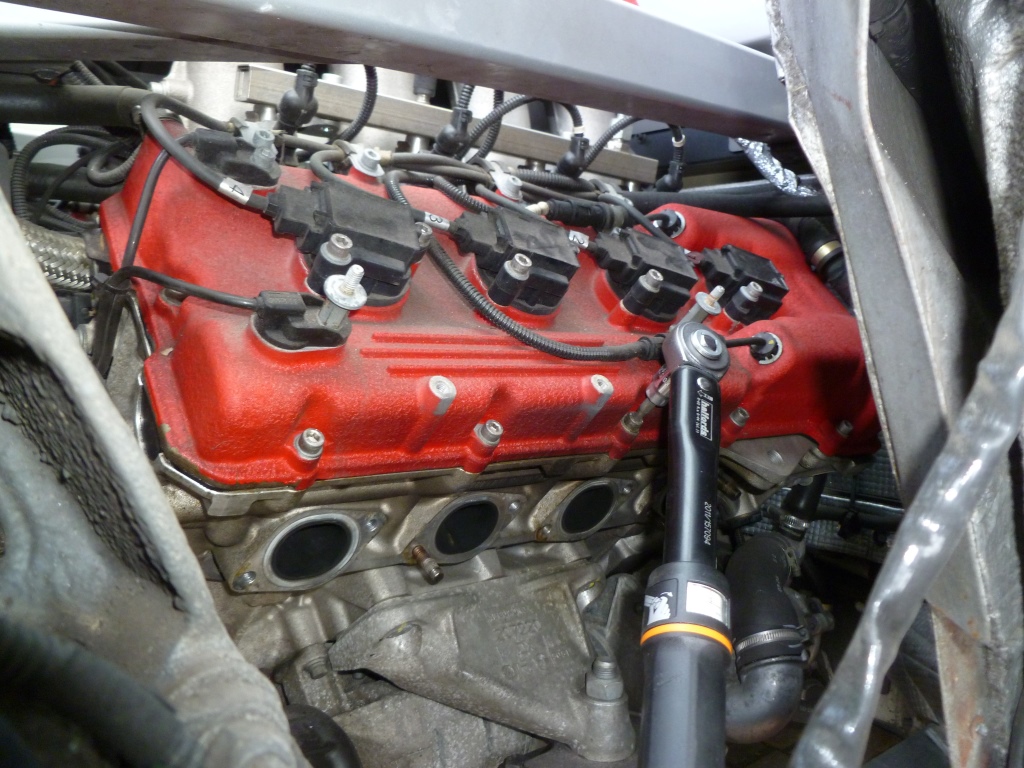
This is what you are working with – the engine mount is right in the way.
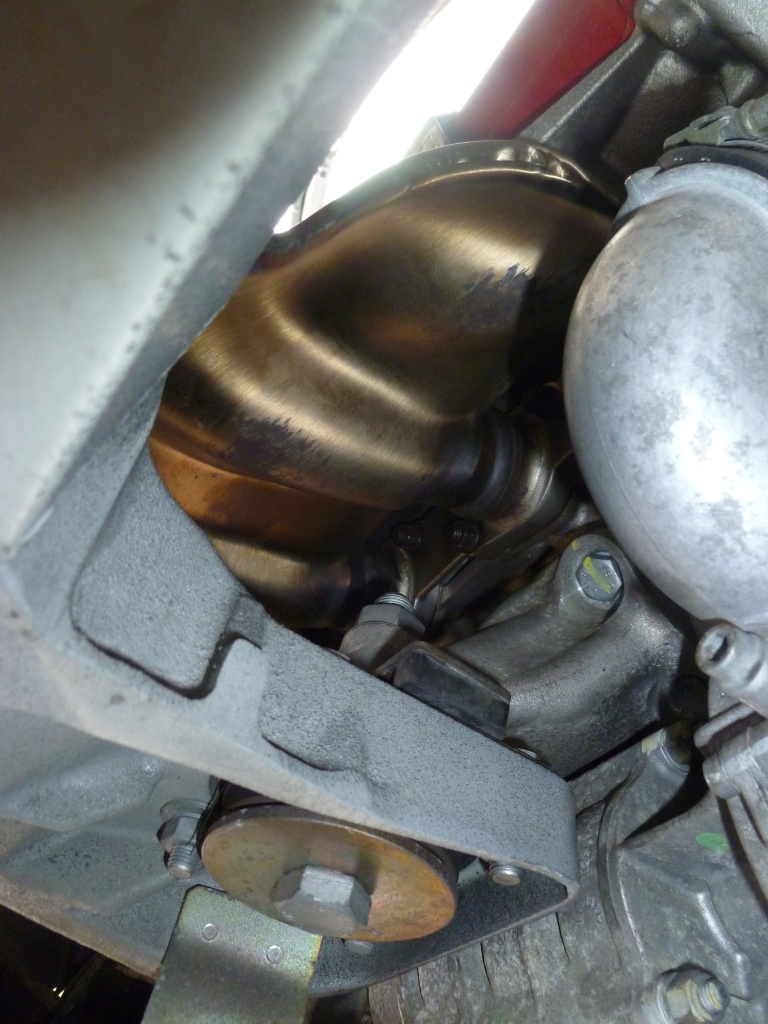
The problem is compounded by the heat shielding which makes access a nightmare. Another issue is that the studs will undo which means more turns to free them (if you can make a turn – most came out 1/8 turn at a time). Just be comforted by the fact that the replacements manifolds go on a lot easier.
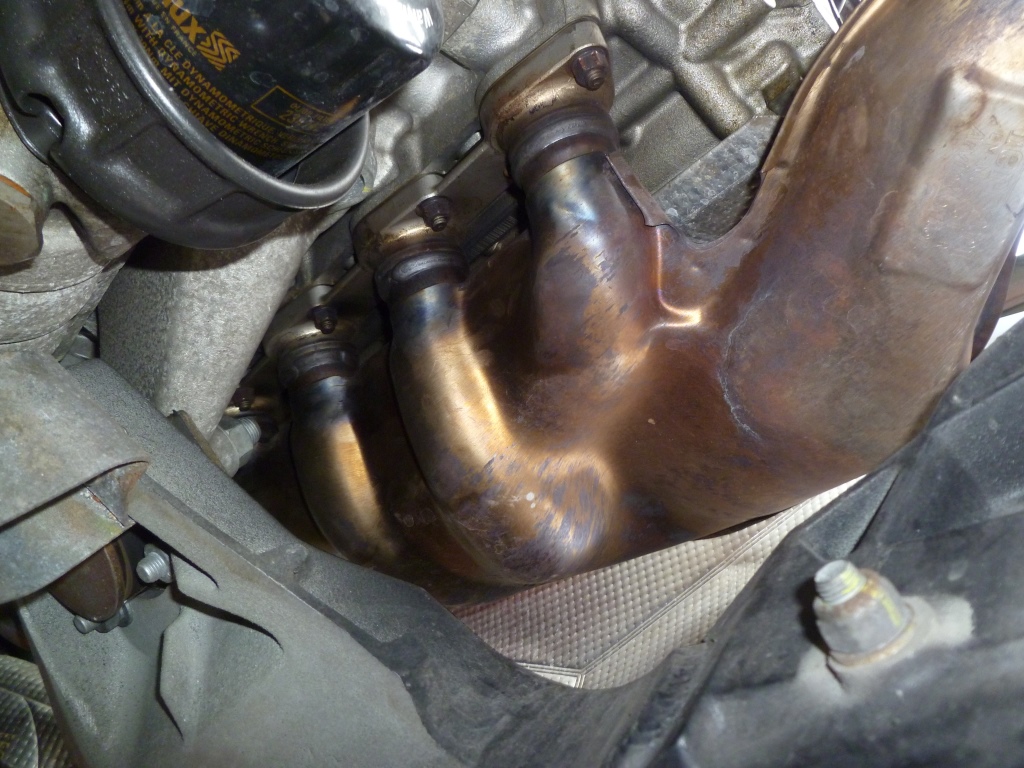
Once all eight bolts/studs are off the manifold can be withdrawn from the car.
Now the studs need to be separated from the bolts. I soaked them in PlusGas and doubled nutted the other end in order to get the bolts off.
Before going any further I took the opportunity to torque up the cam covers (10Nm). I had a slight oil weep from the gasket ends so thought I’d take the opportunity to see if tightening the bolts up would cure the leak. The heat shield needs to be removed first (two 10mm bolts).
Now the studs can be put back into the head.
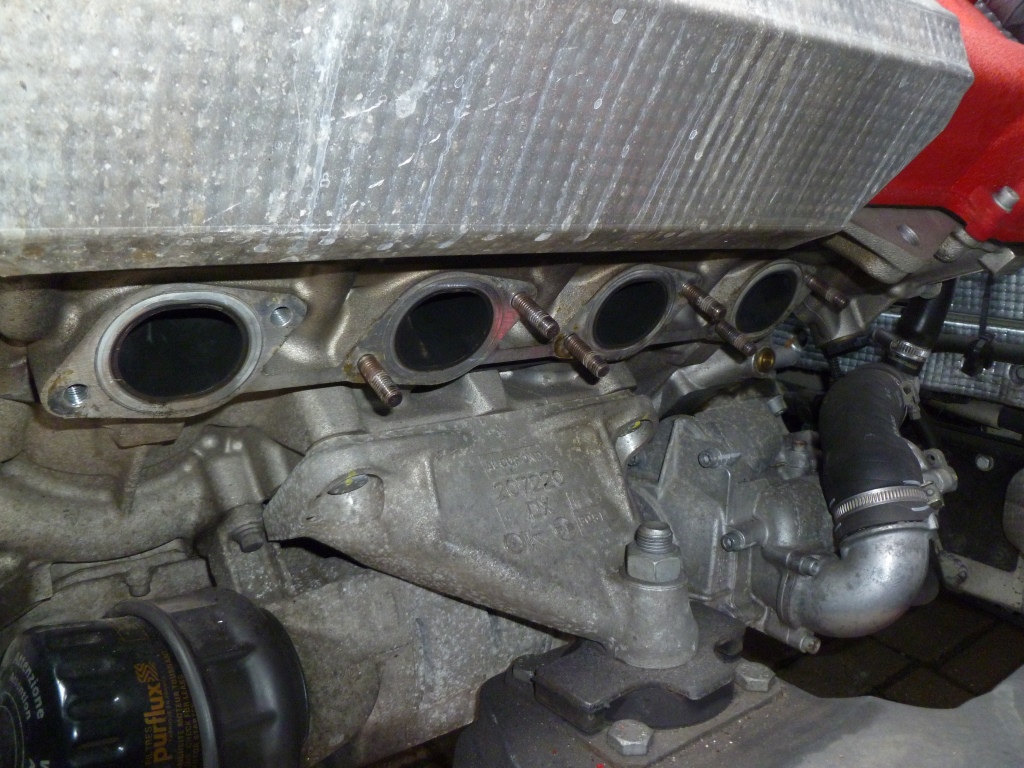
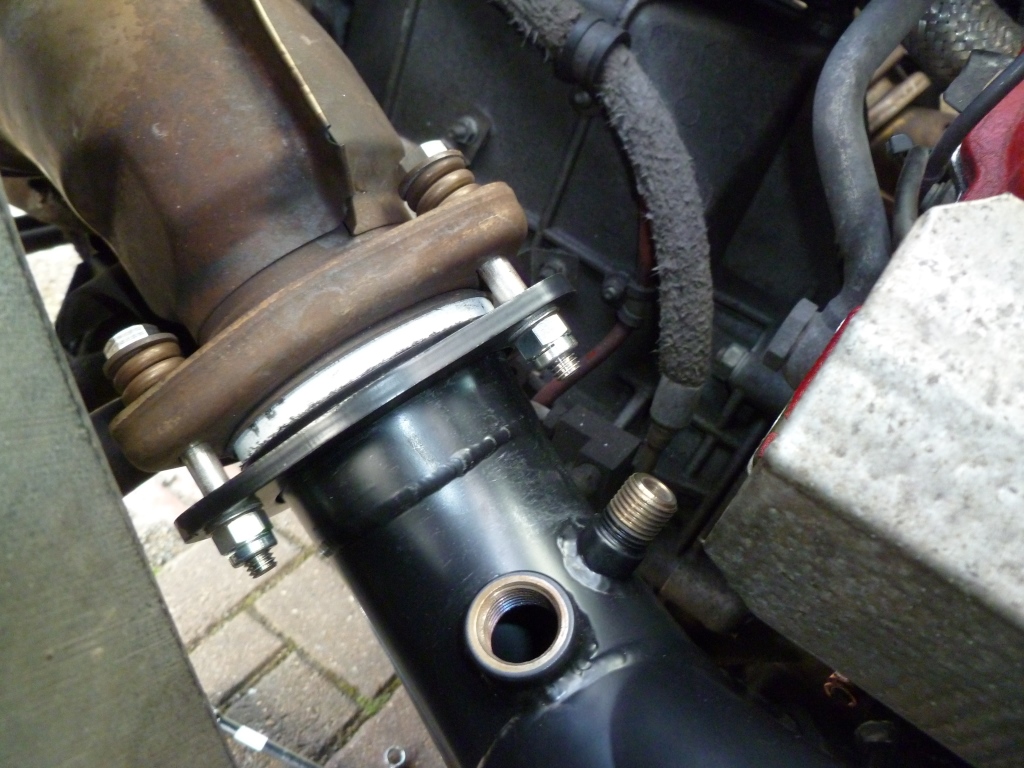
I bought new OEM gaskets which were slid onto the studs.
I also bought new “doughnut” gaskets that fit between the manifold and cat. Fit these to the new manifolds before getting them into place. The manifolds are fitted by inserting them into the cat and then rotating them onto the studs.
Rob supplied new 12mm copper plated self locking nuts – these were put into place (easier typed than done). The workshop manual calls for a tightening torque of 25nm but I’ve got no idea how you’d get a torque wrench into a position to give anything like accurate reading. I just did them up tight.
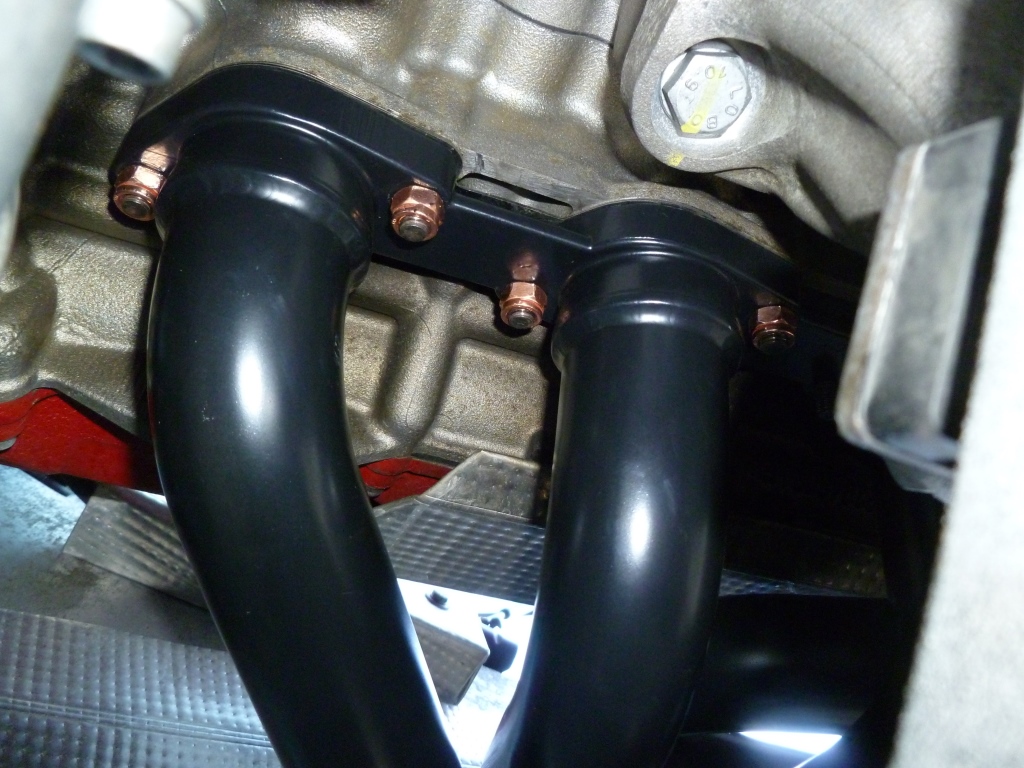

Now the manifold can be bolted to the cat with the new bolts.
Now the temperature probe can be refitted and the lambda sensor put back into the car.
All that’s left is to repeat for the other side. There is the added complication of the AC compressor – here’s what you have to deal with:
Access to the bolts behind the compressor is very tight. At one point I thought I was going to have to remove it in order to get the bolts off. However, after a short break, I tried some new tool combinations/positions and manged to get them all off. Access to the bolts towards the rear of the car seemed positively roomy afterwards:
Once everything is back together the engine can be fired up. Reconnect the battery and wait at least ten seconds with the ignition on before cranking. Whilst the exhaust is cool, put your hand down by the gaskets and feel for gas leaks.
Straight away I noticed an increase in sound – the exhaust note was much more “throaty”. I’ve not driven then car yet but am expecting some decent performance gains – Agency Power claim an extra 25bhp which would be useful in tipping the car over the 500bhp mark. I will report back once I’ve managed a road test.
UPDATE June 2014: I’ve been sent a couple of photos by a fellow F430 owner who ordered a pair of Agency Power manifolds after reading this post. He explored different coating options with Vivid Racing and decided to get the covered in a white plasma costing. Here are a couple of photos – they look incredible…
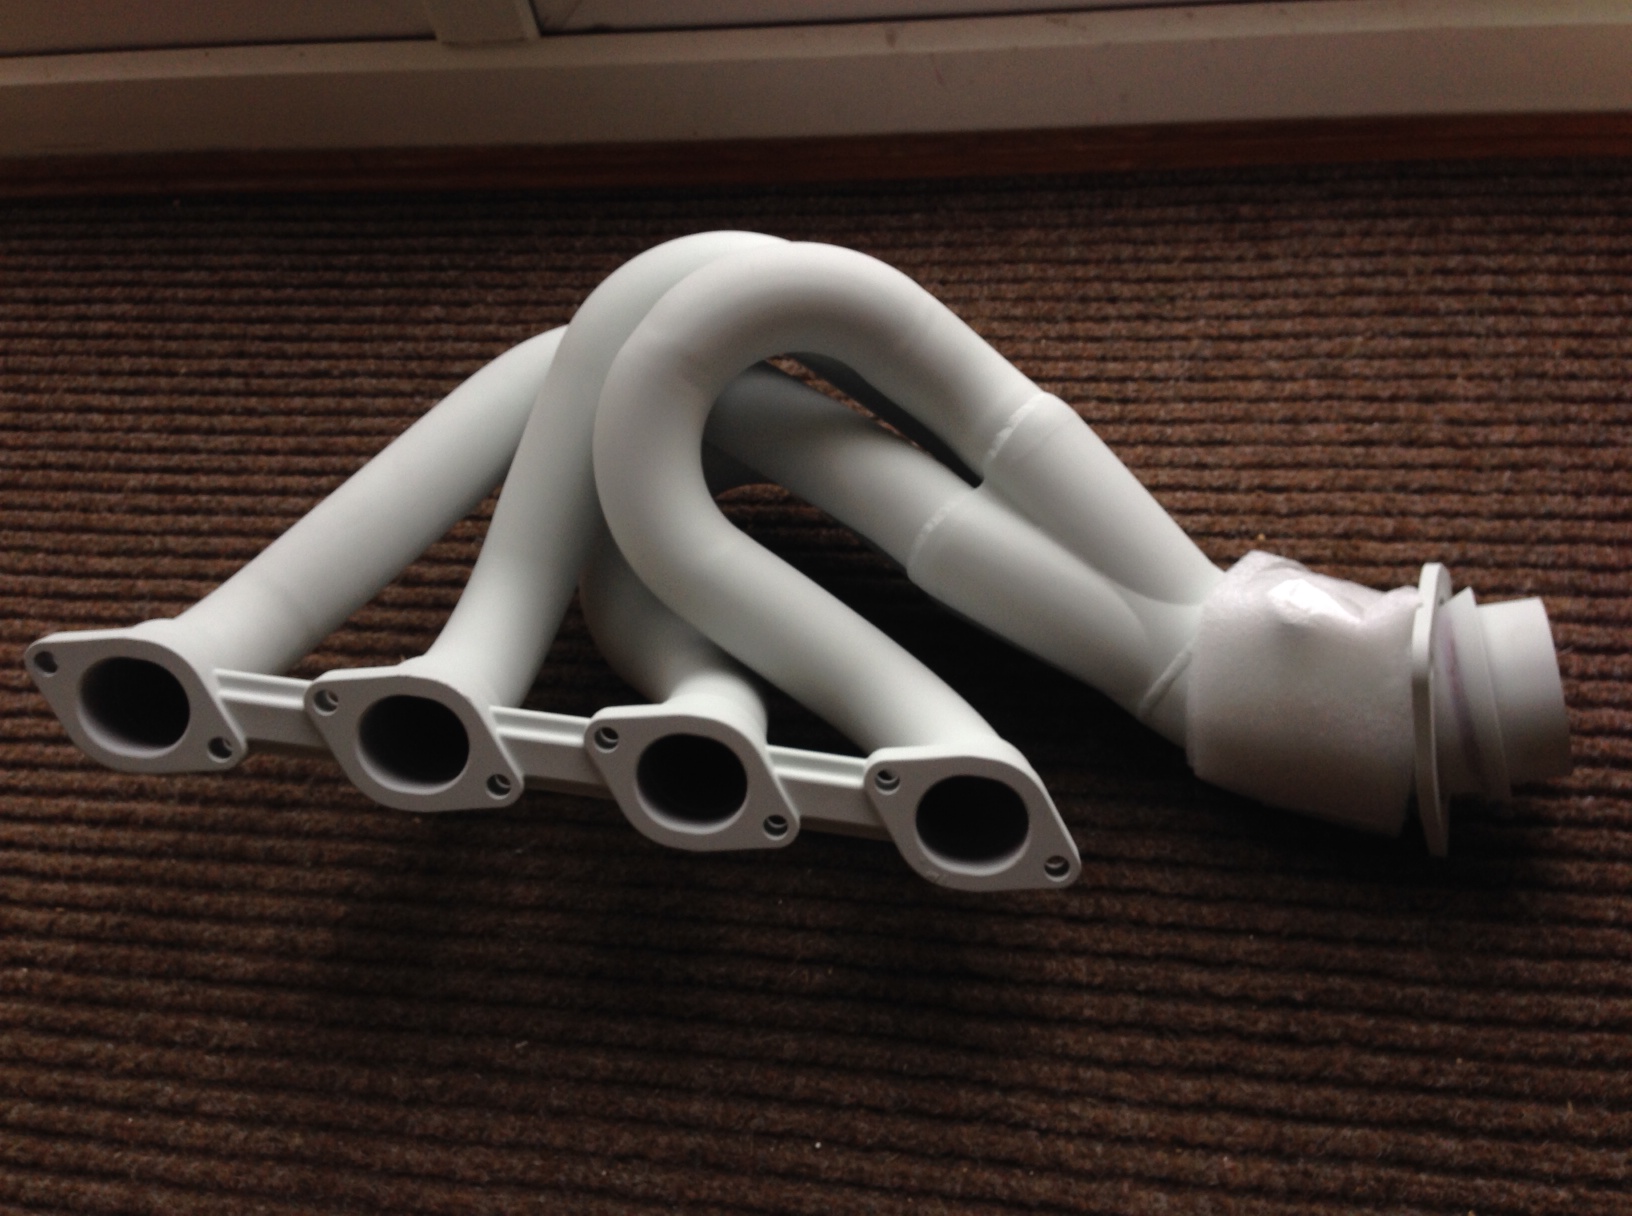
UPDATE 2: Sadly the white coating only lasted 50 miles so I cannot recommend it. However, my manifolds with the black coating are still going strong.
Related posts:
Other posts in this category: Engine and Drivetrain
If you enjoyed this post why not subscribe to this blog for further updates? Simply enter your email address in the box at the bottom of this page. Your email address will not be shared.

Hi Aldous Hope you are well. Great post re the manifolds. It does seem awkward working without a ramp, and if ever you have any planned work you want to do which needs a full hydraulic MOT style ramp then I have one you are welcome to use anytime in a well lit garage. The only problem may be location, but the offer is there. Best regards Nigel
Thanks for the offer Nigel – I may take you up on it sometime!
As always – a great write up. I have a 99 360 so don’t have this issue but a great help for those who do. I’m sure you are enjoying your 430 after the accident that totaled your beloved 360.
Thanks Aldous.
Alan
Hi Aldous,
My “new” 430, suffering reoccurring engine management warning light = camshaft sensors (measures cam timing), now waiting for parts from Ferrari…
the car only has 12k miles on it, 2007 year, 1 previous owner…..
thankfully I have a 2yr Factory Warranty.
is this common?
thanks for any comments
Lack of use probably! In all seriousness, faulty sensors are common (I have a problematic EGT probe on the RHS). The engine bay is a difficult place to be an electrical component.
Something to do with capillary action of oil accessing the sensor?
I’ve not come across the timing sensors being damaged by oil but the cam variator control solenoids do suffer from oil ingress. They can be checked by looking at the connection between the soleniod wiring and the loom – any sign of oil and it’ll have gone bad.
great post – my question is the headers you mentioned don’t seem to have heat shields – what is the risk there please ?
In my experience, temperatures in the engine bay do rise but not to a point that one need be concerned. I started a thread about this here: http://www.ferrarilife.com/forums/modern-v8s-360-f430/29729-engine-bay-temperatures.html
Hi Aldous,
Nice write up. I will be installing headers on my F430 next week. Do i need to apply anti-seize compound to the manifold studs?
You can do but it’ll be burnt off in no time
Thanks. Did you install the capristo exhaust brackets to keep the headers from cracking? What are your thoughts on the capristo exhaust brackets, worthwhile investment?
Thanks
The capristo brackets aren’t for me as I think they are a step in the wrong direction. However, many people are happy with them so it’s up to you!
Hi (again) Aldous,
Need some help. On the right side I am having trouble removing one nut. It is in a not so hard to reach area, with a stubby 12mm wrench, but I kinda stripped the nut a bit. I was using a 12-point 12mm wrench, maybe a 6 point 12mm wrench would be best. Any advice on removing a stripped nut? Maybe take a dremel to the header nut?
Thanks!
Isidro
Your going to need to find a tool to grip the nut. I would start by trying to knock a six point socket over it or try and grip it with some locking pliers.
Once you have something on the nut then you need to give it the best chance of undoing. Refit some other nuts to take the load off the stuck nut. Also apply a load of heat it you can. If a hammer will fit, give the stud a whack to shock the threads.
A dremal would be a last resort for me. The last thing you want is to be damaging a stud that could be stuck in the head.
Good luck!
Thanks Aldous. That did it. It was such a pain though. It took me two days to get this done lol.
I got my AP headers ceramic coated, in your opinion do you think that is enough to keep temps down? I’ve read stories about temps getting so high that the brake cable gets damaged. Do you think it is worthwhile to also get the header blankets from Fabspeed in addition to having the headers ceramic coated?
thanks,
Isidro
Great write up AV! When adding the studs back, do they need to be torqued down or will this be tightened correctly with the bolts?
Just wind them in until they hit the stops. No need to torque them up
What tools a combinations did you use to remove the nuts from the air conditioning side of the engine??? What a hugger!
Can I assume it will be much the same replacing the manifolds on a 360?
Pretty much, yes
Hi Aldous,
Did tightening the valve cover bolts solve the leak?
Thanks,
It will only slow it down temporarily. In order to completely stop it you should replace the gaskets